
All file types are not created equal. A low-resolution art file is one of the biggest obstacles to a successful, high-quality t-shirt print. It’s the number one issue our Art Department deals with, followed by copyright issues and what to have for lunch.
This article defines the characteristics of the two main file types and explains the differences, plus examples. We cover why some are better and provide a short list of file types to use and a few you should avoid, if possible.
What’s the best file type for printing?
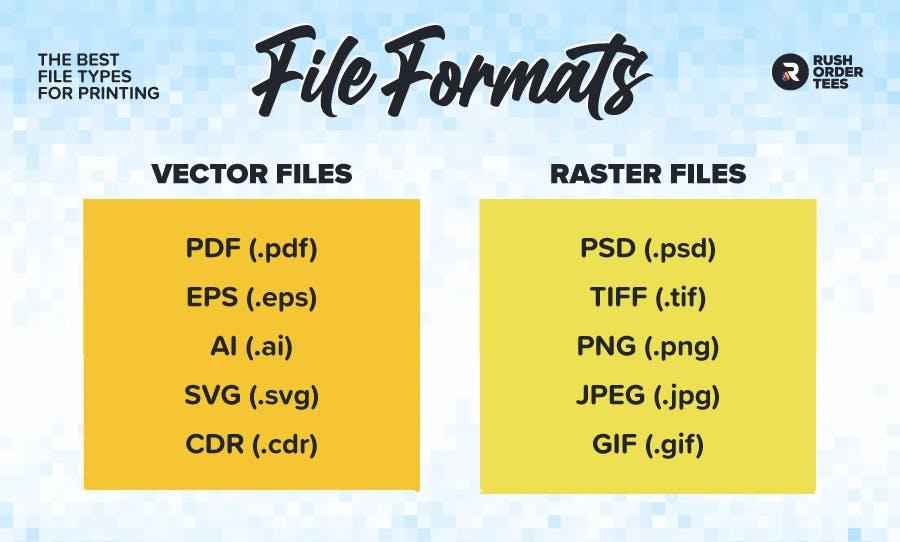
There are two main types of image files: vector and raster (also known as bitmap). A vector file is the best file type and highest-quality image format. It will always produce the best possible result, with very few exceptions. Vector file types include AI, EPS, and PDF.
Raster files can be great–and necessary, in the case of photographic images–but they should be high-resolution with minimal compression to get the best results. So the important point with raster files is that it’s not as much the file type that makes the difference, but the quality of the file.
Here’s a graphic showing the two main file types and examples of their formats:
The files that tend to be the most problematic are low-resolution and/or highly compressed raster images from the web. They require more work to prepare for printing and sometimes must be recreated. We’ll explain how to evaluate your files for quality. First, let’s look at the difference between the two main file types.
Raster vs vector: what’s the difference?
A vector graphic is defined by mathematical points, while a raster graphic is made of pixels. Each point in a vector file and how they relate define the lines and shape of graphic elements. Other data points include colors, gradients, text, and effects.
The key feature of vector files, which makes them so valuable for printing, is that they are infinitely scalable. You can resize the image as big as you like without losing quality– which is not true of raster files.
A bonus feature of vector graphics is they tend to be much smaller in file size than raster graphics. The reason is simple: raster files must store the data for each pixel, while vector files only need to store the points that define objects.
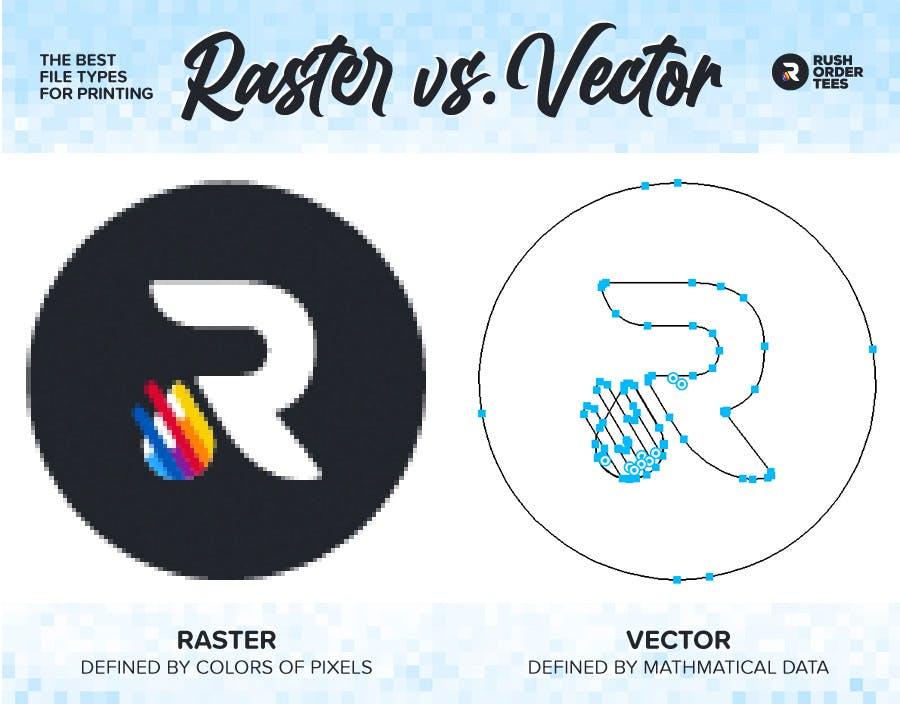
The logo on the left is a close-up of a raster file. On the right is the vector version (shown in “outline” view). The raster file needs to store the data for each pixel you see; color, black, white, or shades of gray describing the edges. The vector file only needs to store the data for each point, how they relate to their adjacent points, and the fill color.
Saving a raster file is like memorizing a whole book word for word while saving a vector is just memorizing the summary and the number of pages. The bigger the image size of a raster, the bigger the file size, as the number of pixel data it needs to store grows exponentially with the size of the image. That single book to memorize quickly becomes a complete set of encyclopedias.
The vector file, no matter how big you make it, will keep those clean lines you see and keep the same file size because the mathematical formula that stays the same– independent of image size.
Both vector and raster (or bitmap) files can take many forms. Most graphics programs will allow you to save images as a variety of different file types. Here are the main file types for each format.
Vector file format
Vector file types can be compound files: that is, they can contain raster files. So a vector file can contain raster files–but not vice versa. It’s fairly common for a vector file to have photographic elements or gradients, but the layout, shapes, and type are all in vector form. Here are the three most common vector files used for printing.
Vector file types
PDF (.pdf), which stands for Portable Document Format, is one of the most popular file types, and for good reason. It was standardized, meaning it can be opened or viewed on just about any operating system with no app that created it and will keep its original fonts and layout. PDFs can also contain “rich media” such as GIFs, 3-dimensional objects, and video clips. Just don’t ask to print those on a t-shirt. (We tried, it doesn’t work).
EPS (.eps) stands for Encapsulated PostScript and is one of the standard vector file types. It’s a reliable format that tends to be self-contained, so it’s ready for action. There are lots of programs that can save EPS files, such as Adobe Illustrator, Photoshop and InDesign, even CorelDRAW. One major platform that will not allow you to save as EPS is Microsoft Office. But that’s ok–please don’t use Office to make designs.
AI (.ai) is Adobe Illustrator’s native file type. We love these because it’s the premier vector graphic program, so the person who made it is most likely a professional. If you’re in the market for a decent vector editor but don’t have the budget for Adobe Illustrator, there is a free program called Inkscape that people seem to like. We use it just for converting CorelDRAW files (.cdr) to something we can open in Illustrator (.eps).
Which vector file type is best? It depends on what you’re using it for, who you’re sending it to, what system they use, and so on. If you’re unsure which format to save your file, don’t stress about it. Any of them will work for printing. If you want to use the most versatile format, that would be a PDF.

Vector file pro tips
Here are the top two issues that come up regarding vector files:
Create “outlines” of your fonts
When you work in vector format, the fonts you use are from your own computer and do not automatically send along with the file. The default state of the text is “live” which means editable. This can be a problem if your printer doesn’t have the same font. If you need to keep your fonts “live” in the file, send your printer the fonts along with the vector files.
You can avoid missing font problems by creating “outlines” of your type. In Illustrator, select all your type, and under the “Type” menu, select “Create Outlines.” This will convert all your fonts into text shapes and make them ready to be printed.
Placed Files vs Linked Files
When placing a raster file into a vector document, some people accidentally “link” the file rather than place it. This creates a reference image that appears in the preview, but (whump whump) it’s not there when you open the document. If the linked file is not included along with the main file, it will not work.
So make sure to uncheck the “link to” box when placing a file.
Raster file format
Raster files, also known as bitmaps, are the most common category of image files out there. The vast majority of files you see on the web are raster. The word bitmap is a bit more accurate: it’s a map of bits. It’s a grid of pixels with information stored for each of them, related to their position, brightness, and color.
Here are the three of the top raster file types for printing:
JPEG, short for Joint Photographic Experts Group, is designed to encode photographs. It’s the most popular format used on the web and the de facto standard image format. It’s ideal for rich colors and gradients, but it does use compression, so there’s some data loss every time you save it. For large files, it’s best to save it as a PSD or a TIFF to avoid loss, and then a JPEG as the last step.

TIFF stands for Targeted Image File Format and was designed to interchange between scanners and printers. It’s become extremely popular among photographers and graphic designers for its excellent compression. TIFF files tend to be larger than JPEGs, but the tradeoff is worth it for retaining high quality. So if you have a TIFF and JPEG, now you know which one we prefer.
PSD is simply a Photoshop document. It’s Adobe’s native format for their industry-standard graphics program. It’s hard to overstate how popular this product is. I’ll just point out how it’s become a verb: to “Photoshop,” something digitally alters an image. Although there are competitors in this space, Photoshop has stood head and shoulders above the rest for decades.
GIF, short for Graphics Interchange Format, is one of the oldest image files, going back to the ’80s at a company called CompuServe, which everyone forgot about. Although still widely used, its features are limited. It can only support 256 colors, which makes it one of the worst choices for image files to be printed. There are typically significant limitations to print quality.
PNG (Portable Network Graphics) was developed to be an improved, non-patented replacement for GIF. Unlike GIFs, PNGs can support millions of colors plus an alpha channel (transparency). And there’s no compression, so you won’t lose any important image data. This format was designed especially for images on the internet and is second only to JPEG in popularity.
Pro tip: If your file has layers, transparencies and other information, that can be very useful for a graphic designer or your printer– but it can weigh down the file size. So just Zip it for sending.

Raster vs. bitmap: what’s the difference?
Not much. The difference is largely semantic, and the terms tend to be used interchangeably. Technically, a bitmap represents an image that has been rasterized (generated by a scanning pattern of parallel lines). If you have a vector graphic and you want to display it on the web, you rasterize the image to convert it to pixels.
The word bitmap can be traced back to its origins as an early Microsoft image file format called BMP (short for bitmap). This format is rarely ever used anymore. If you see one, it may be leftover from the ’90s.
Raster files with transparent background
Only certain file formats support transparent backgrounds. This doesn’t apply to vector formats because, in their files, an object is either there or not (no need to remove a background that doesn’t exist). Objects can have partial transparency and be stacked on each other infinitely because the image is not flattened into a raster.
The three most common raster files that support transparency for printing are PNG, PSD, and TIF.
Tip: Check out the Ninja Background Remover.
Why transparent background?
If a flat graphic is on a white background, and we’re printing on white t-shirts, there’s nothing to worry about. The same goes for a flat graphic with a black background printed on black shirts.
But if you have an image with a white background printed on black or color shirts–or vice versa, an image with a black background to be printed on white or color shirts, that’s when it becomes an issue.
For t-shirt printing, having a transparent background is ideal and will print great on any color shirt. It also avoids the dreaded “box” look, as if you just glued a poster onto a shirt.
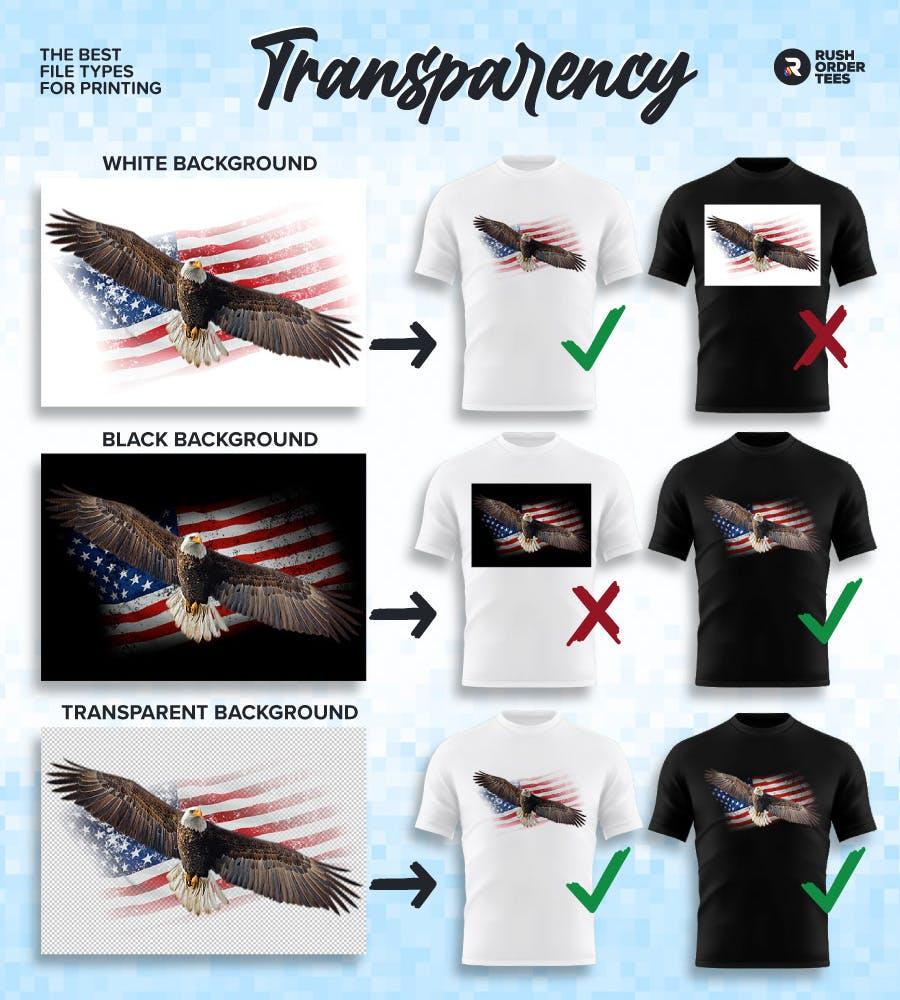
Bottom line: Use a file with transparent background, if possible. If you’re creating a file from scratch, save it as a PSD or PNG with the background set to transparent. It saves lots of work and will prevent the print from having terrible-looking edges. Plus, it makes Frank happy.
Raster file pro tips
The raster file format contains much more information than vector files and therefore has more settings and adjustments to be made. Resolution and compression are two settings that, next to size, will determine your image quality more than any file type it’s saved as.
Resolution
An image’s resolution indicates the amount of detail it can hold, which is very important for printing. The higher the resolution, the more detail. In specific terms of graphics files, it’s the number of pixels, measured in pixels per inch (ppi) or dots per inch (dpi).
As you might expect, the more pixels, the better. The resolution of web images is typically 72 dpi, which reflects the screen resolution of most computers, but is far less than ideal for printing.

What’s the ideal resolution for printing?
At RushOrderTees, we ask that submitted image files be at least 200 dpi at full size. The full-size part is key; we often get files with a higher resolution, but the actual image size is a fraction of the size it will be printed. So if your graphic is for a full-size back print, your file should be at least 200 dpi at 12″w x 14″h.
So does this mean that 500 dpi is even better? Yes, it is, but it may be unnecessary. There are diminishing returns that occur after 300 dpi. Anything more than that can become overkill. So for ease of storage, uploading, and emailing, it doesn’t need to be bigger than 300 dpi at full print size.
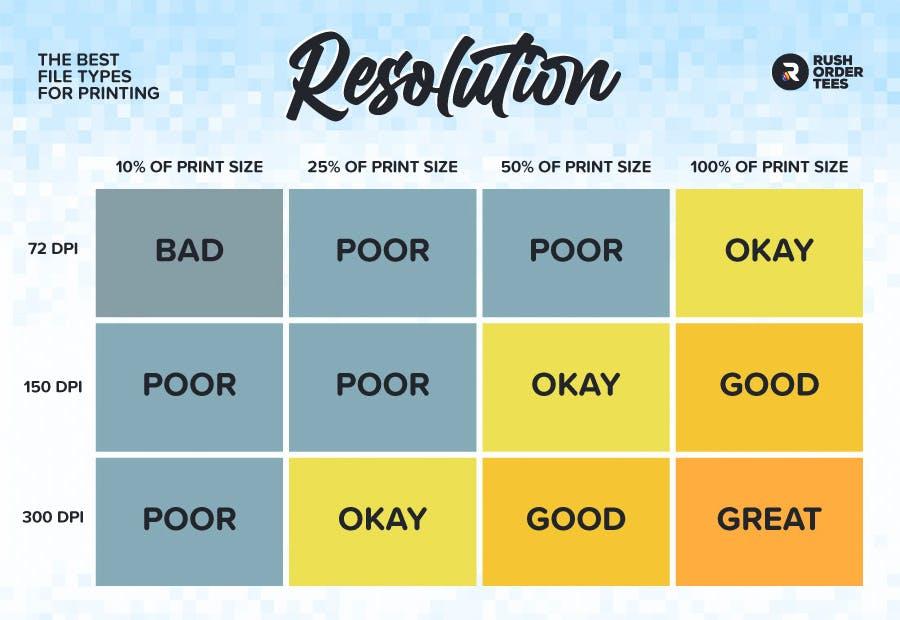
Why not just increase the image size? if you have a smaller file, simply scaling it up in Photoshop will not do the trick. While it helps a bit by smoothing out some of the rough edges, it doesn’t have the additional image data that comes with a larger-sized file, which is the difference that makes the difference.

Compression
Image compression is a factor that gets overlooked fairly often. Mostly because it’s hard for the average person to see, even if they know what to look for. But if you zoom in closely, especially using an image editor, you’ll see “artifacts.” Image artifacts are weird-looking clumps of pixels left over from compression and can make or break an image’s quality.
Compression is how we get file sizes to be smaller, making them easier to store, send, share, and post online. There are two main types of compression: lossy and lossless. As you might have guessed, lossy will reduce the quality of the image to varying degrees.
The best compression settings for printing
Typically, you want to save your image files with “lossless” compression such as TIFF or PNG. Lossless will leave the quality intact while still reducing the file size. But even lossy compression, such as JPEG, can do it without much effect on the image, as the data it discards is barely noticeable.
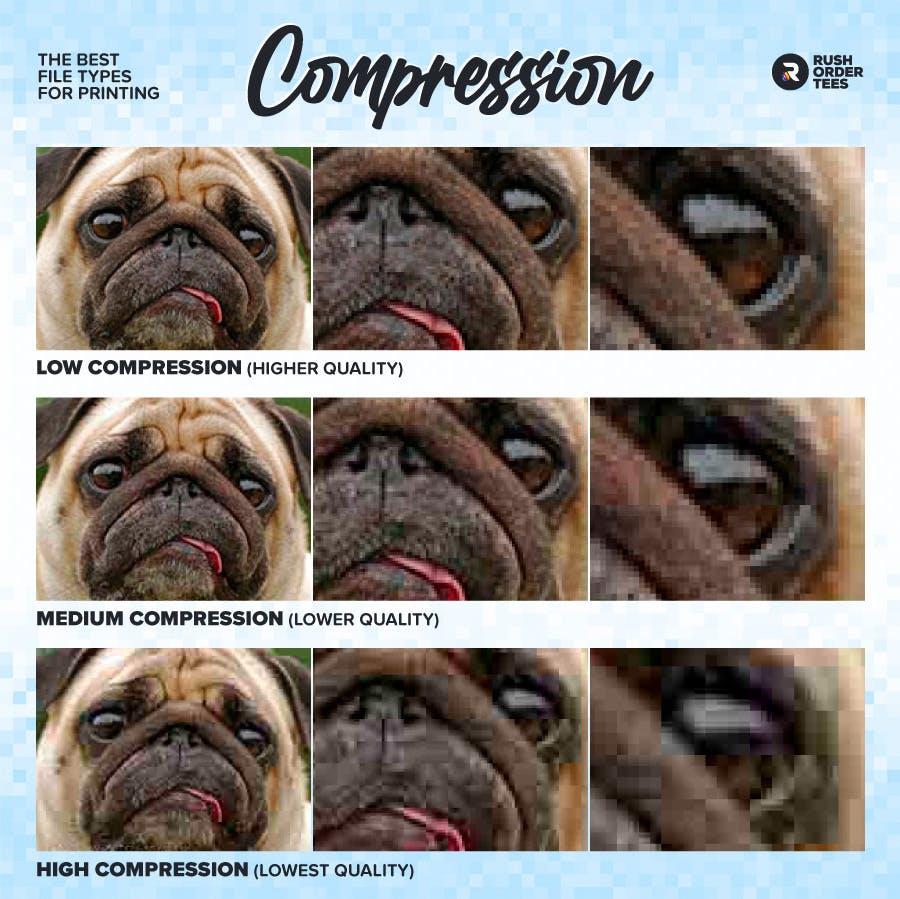
But things can get ugly when you set your compression setting too high or re-save the file repeatedly. Here are three levels of JPEG compression at 72 dpi:
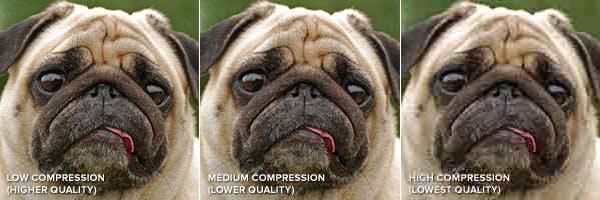
As you might notice, the image quality degrades as more compression is used. You might think it doesn’t look too bad, but remember: we’re looking at a small image on a screen. While 72 dpi at 2.5″ wide can be fine for a small image on the web, we will need to scale the image to 300 dpi at 10″ wide for printing.
Let’s look at those same images but zoomed in to show the actual pixels we’re working with, and you’ll see the blocks and blemishes that appear, known as “artifacts.”
Bottom line: Don’t let your images be pugly. Use a high resolution, low compression, and transparent background.
How to convert file formats
Converting a vector to a raster is easy: you rasterize it. But let’s say you have the more common problem: you only have a low-resolution JPEG and want to convert it into a nice clean vector file. Is there an easy way to do that? Not really, but we’ve got the answer. If you just need to switch color modes, learn about the difference between RGB and CMYK.
Raster to vector
There are various free online vectorizers but be warned: you get what you pay for. Results may vary. Some restrictions apply. Ok, it’s mostly crap. You’re much better off purchasing a good one like Vector Magic.
If you already have Adobe Illustrator, you’re lucky: it has a built-in Live Trace feature. It takes a bit of trial and error to get used to. Expand the advanced features and experiment with different settings to achieve your desired result. And, of course, there are plenty of tutorials and videos online to help you out.
Vector to raster
In your graphics program, choose “export,” and a window appears with resolution and compression settings. You can export as a PSD, PNG, JPEG, and more. There are also converter apps out there for whatever needs you might have.
If you don’t have a graphics program, that’s ok. We’ve compiled the top 8 free alternatives to Photoshop.
Need more help?
You can always leave it up to our Art Department when in doubt. We do this all day, every day. And there’s no charge for basic image repair. Just let your sales rep know what you’re going for, or add a note to your online order, and we’ll take care of it for you. Start by putting your order together in our easy-to-use Design Studio, and we’ll do the rest.

About the Author
A graduate of the Multimedia program at the University of the Arts in Philadelphia, Imri Merritt is an industry veteran with over 20 years of graphic design and color separations experience in the screen printing industry.